Showing posts with label crafting. Show all posts

Wednesday, February 16, 2011

Sock Monkeying Around

So my latest craft endeavor has been to get some presents whipped up for the up-coming babies that are entering the world here soon.

A friend had a little treasure tucked away in her fabric bins that I ganked from her:

020

Yup, those are totally what you think they are! Three pairs of original Nelson Rockford red heeled socks... aka sock monkey socks.

Now, I've never attempted to make a sock monkey and I think that if I hadn't run into this specific item, I probably would never have tried. But I had to with these (that or sell them on ebay :lol:)

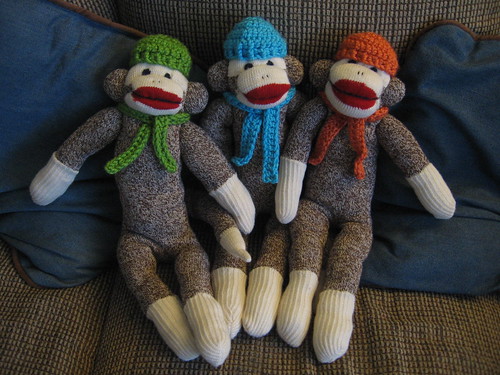
So after a little more research (the instructions are a bit on the vague side as far as limb placement -- the tail goes above the white butt, not in the middle), I got to sewing and stuffing and stitching and accessorizing and after a late night (love you Michelle!) and a couple more hours tacked on to that I now have three finished sock monkeys ready to go to three soon to be born boys! (accessory patterns are below)

008

Patterns for Accessories:

Abbreviations:
ch = chain
st = stitch
dc = double crochet
fphdc = front post half double crochet
bphdc = back post half double crochet

Hat: made with worsted weight scrap yarn and an H hook.

rnd 1: ch3. first two ch count as first dc. 9 dc in the third ch from hook and join to first dc (10 dc total)
rnd 2: ch2. dc in same st. 2dc in each st. join (20 dc total)
rnd 3: ch2. dc in same st. dc in next st. *2dc in next st. dc in next st.* repeat from *to* till end. join (30 dc total)
rnd 4: ch2. dc in every st. join (30 dc total)
rnd 5: ch2. fphdc around next st. *bphdc. fphdc* repeat from *to* to end. join. cut and weave in ends.

note: this also makes for a cute monkey beret if you let the ribbing tuck under instead of pull it around the monkey's head. Also, pom-poms would be a great touch but I decided against it for these because of the fact they are for newborns.

Scarf: made with worsted weight scrap yarn and an H hook.

ch 52. dc in back loop of 3rd ch from hook and each ch after. cut and weave in ends.

note: the green scarf is actually done in hdc because I didn't have enough yarn to make the full dc scarf. Also, a little fringe would be cute here if you like!

Friday, January 14, 2011

January thus far...

I've been working on a pair of socks that I'm making for a trade. The socks are made from Handmaiden Casbah (not Casbah Sock) in colorway Midnight and the pattern is Yarnissima's Firestarter.

Progress pic modeled on my hand. You can see the colorway beautifully here.


And the FO. There really are two but I can only find one of my blockers :lol:


Also, I found these at my local thrift store. Pretty much an entire set was included (missing one letter and one square) and the kids are getting a kick out of it.


But the real reason I purchased them was so I could use them for things like this:


Yup... mama got herself some blocking mats. I think my next investment is going to be blocking wires :blush:

BTW: the shawlette is hand spun and knit. Spun from chasing rainbows merino/bombyx in colorway Opal and knit with the Argus Shawlette pattern by Wendy D. Johnson

Friday, July 9, 2010

DIY Andean Plying Tool

So in an act of desperation I invented me an Andean plying tool. If you don't know what Andean plying is, it's a technique where you wind unplied yarn onto your wrist in a certain way and then you are able to ply it with itself and off your wrist. The biggest downfall with Andean plying bracelets (referring to the yarn that is around your wrist like a bracelet) is that 1)you are supposed to wrap part of the yarn around your finger and eventually, if you have enough yarn, your finger starts to lose feeling and turn blue and 2)once it's around your wrist, it's really hard to get it off when you need to, oh, I don't know... pee? So, with those two things in my head, I was looking at my spindle full of singles and dreading the bracelet (though it's my all time favorite way to ply). Then, inspiration struck.


It's made from a large disposable plastic cup, two 10" knitting needles and one 7" DPN.


The top needle is for wrapping around like you would on your finger. The bottom 10" is for holding the yarn as you wrap around. The DPN is for tying the ends to (It's not really that necessary. If you can think of another way of keeping the ends free... go for it). The picture of the inside shows how I used the three needles to stabilize each other.

Tuesday, June 1, 2010

New Giveaway

Over at CraftBlog there's a review and giveaway for the book The Creative Family written by Amanda Blake Soule of SouleMama.com. It's a really great book to use as a springboard to adding more creativity into your everyday life. There are a couple things in it that, as a Jesus follower, I would not implement in my home, but with a little adaptation and tweaking, turn into great fits for my family. I highly recommend it for anyone with kids.

Check it out over at CraftBlog.com