Let me be the first to admit to you... I don't have it all together. Ever since I was little I've been more of a clutter collector than an organizer. When it comes to personality types I am much more a squiggle than a square, and it has spilled over into every aspect of my life. My husband on the other hand is much more a square and much less a squiggle. This "minor" difference between the two of us is a pressure point in our relationship. My piles of "organized clutter" stress him out and his need for "a place for everything and everything in it's place" makes me feel confined and boxed in.
My walk with God as brought me to a point in my life that I need to live for my God, not for myself, and be a "helper suitable", as some circles would say, to my husband. I hope that by writing about my journey, and undoubtedly my struggle, I can connect with others who are going through the same thing and be an encouragement to those who feel as alone as me in this walk.
My Place in My Home: A wife's responsibility
I am a wife and with that comes the responsibilities of being a wife. In my home, my responsibility as the wife is to be my husband's help mate. That manefests itself in so many different ways in my relationship but ultimately it means that when my husband, Rob, needs help, I'm supposed to be there to provide it. This doesn't mean I'm walked on or that he has it easy because I do everything for him, it means that we are supposed to function as extentions of each other instead of independantly of one another. We are supposed to be a team and we are supposed to be more efficient that way.
Now, look at those words "supposed to." Yes they are in there for a reason. The reason is, a lot of times I am not fulfilling my end of keeping my home a retreat for my husband. Instead it is like a war zone to him. How could I expect him to function his best as a father and husband when the first thing he comes home to is, in his mind, chaos?
This has caused many an argument between the two of us. I feel like I'm trying as hard as I can and it is never good enough for him. I clean what looks like it needs cleaning (and that is everything) and at the end of the day, things still look cluttered. I get discouraged, burned out, and give up. After things get worse, I try again, get discouraged and burned out again and give up -- again. That's my cycle. It has been for years. And for the longest time I couldn't break loose of it.
Tuesday, April 6, 2010


Friday, April 2, 2010
Trying to Make This Home
So I've been in San Jose for about two months now and I'm still working on making this place home. At this point in life I have become quite used to moving every 1 to 2 years but what I'm not used to is the change that happens when leaving. My moves, save one prior to this one, have always been local, so changing friends, churches, schools, has never really been an issue. I'm also more of a small town girl and San Jose, with it's population 900 some-odd thousand, is not such a small town. It's busier, it's faster, it's so much more self absorbed. Yes, I said that. I know that there is selfishness everywhere you go, but, for reasons I can't quite describe, everything feels so much more "me" oriented around here (and not the "me" as in people are considerate of "me").
Trying to adapt to the busyness has been a bit overwhelming, and when I get overwhelmed... I shut down. That's my coping mechanism. Kinda sad really. But I have been wanting to get back on here and put my thoughts down on, umm... machine.
Part of adapting and adjusting is getting things back in my life that need to be, and getting things out of my life that need not be. Blogging -- back in. I have something I'll be rolling out in the next month so keep your eyes open. One thing that's leaving is the excessive amounts of toys in the kids' playroom. Yes, I purged the toy closet before we moved but somehow, between there and here, the toys multiplied. So now it's time to divide.
So as I work on making this house a home, I'll be back here too from here on out -- battling my world one blog post at a time I guess.
Trying to adapt to the busyness has been a bit overwhelming, and when I get overwhelmed... I shut down. That's my coping mechanism. Kinda sad really. But I have been wanting to get back on here and put my thoughts down on, umm... machine.
Part of adapting and adjusting is getting things back in my life that need to be, and getting things out of my life that need not be. Blogging -- back in. I have something I'll be rolling out in the next month so keep your eyes open. One thing that's leaving is the excessive amounts of toys in the kids' playroom. Yes, I purged the toy closet before we moved but somehow, between there and here, the toys multiplied. So now it's time to divide.
So as I work on making this house a home, I'll be back here too from here on out -- battling my world one blog post at a time I guess.
Friday, January 15, 2010
Taking A Moving Break
So we're making the big move on the 22nd and, as you can imagine, there's a lot that needs to get done. Because of that, I'm taking a break from the blog, an most other online communities I'm in, in order to take care of the packing and cleaning that needs to get done.
When we get moved in and settled, I have a tutorial in the wings and some other surprises.
I'll see you in San Jose!
When we get moved in and settled, I have a tutorial in the wings and some other surprises.
I'll see you in San Jose!
A New Crafting Community
There's a new crafting community that's opened up. It's called CraftForum.com and it's a place where people of all different crafting mediums can come together and show off their newest creations, discuss tips and techniques, or just meet like minded people and chat about life.
I joined about two days ago and am really enjoying the conversations and community feel that this forum has. There are a lot of really talented people over there and I am getting all sorts of inspiration to try new and different mediums and techniques.
I invite you to join! Just click on the image below and register for a username and such. My user name is UndrThTblNDrumng (as it is just about everywhere else :lol:). I look forward to seeing you over there.

I joined about two days ago and am really enjoying the conversations and community feel that this forum has. There are a lot of really talented people over there and I am getting all sorts of inspiration to try new and different mediums and techniques.
I invite you to join! Just click on the image below and register for a username and such. My user name is UndrThTblNDrumng (as it is just about everywhere else :lol:). I look forward to seeing you over there.
Thursday, January 14, 2010
Simple Pleasure #2
Chocolate.
Do I really have to say more?
On a side note: I have been trying to cut back on my carbs because, well let's face it, I eat way too much of them. After completely cutting them from my diet for three days (no specific diet, just needed to break the cycle) I broke the "fast" and then had a piece of chocolate. Not a big one and not any sort of special imported from Switzerland "open in case of emergency" kind of chocolate. I believe it was one of those individually wrapped dark chocolate bites. Well, it was the most amazing, wonderful, I've never had chocolate taste so good! piece of chocolate I have ever had!
So with that, I would say that chocolate is good, but chocolate in moderation is even better!
Do I really have to say more?
On a side note: I have been trying to cut back on my carbs because, well let's face it, I eat way too much of them. After completely cutting them from my diet for three days (no specific diet, just needed to break the cycle) I broke the "fast" and then had a piece of chocolate. Not a big one and not any sort of special imported from Switzerland "open in case of emergency" kind of chocolate. I believe it was one of those individually wrapped dark chocolate bites. Well, it was the most amazing, wonderful, I've never had chocolate taste so good! piece of chocolate I have ever had!
So with that, I would say that chocolate is good, but chocolate in moderation is even better!
Sunday, January 10, 2010
DIY Animal Lovie
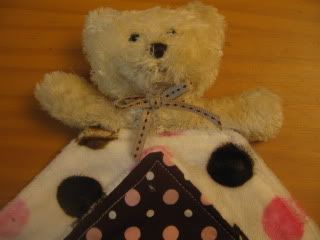
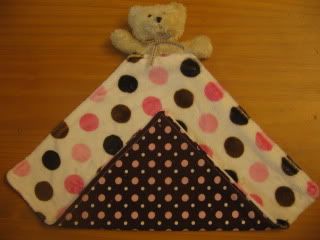
This project started as a baby shower gift for a girlfriend. I needed one in lieu of her actual gift -- which wasn't finished. Eying one of the far too many stuffed animals my children had, an idea struck me. Those stuffed animals would make wonderful upcycled animal lovies! I came up with this pattern and, because it's quick and simple, I have a feeling I will be making many more of these for friends and charity.
These instructions are for making a lovie that has animal parts in only one corner. It can be easily adapted though if you would like to have animal hands in the corners or a head in the middle of a side and hands and feed in the corners. Just repeat Step 3 #2 with each corner and animal part you want to use. And if you want a head on one side, just leave a section on that side open when stitching the blanket closed.
I would appreciate if you only used this for personal use and gifts but if you feel you must sell them, please consider donating some to a hospital or battered women's shelter or some other charity. Thank you.
Materials:
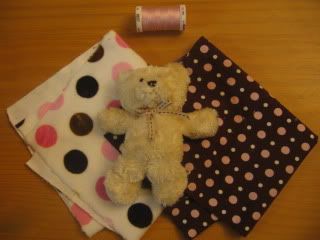
1 small stuffed animal
2 15x15" squares of fabric in matching or coordinating prints/solids (suggested fabrics: minky, flannel, woven cotton, chenille, satin)
sewing machine or sewing needle
coordinating or contrasting thread
scissors
Step 1: Cut-up the stuffed animal
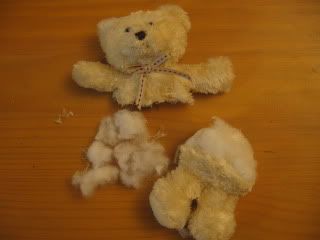
My kids had a hard time watching this one :lol:There are a couple different ways you can do this. If you want an animal lovie with the head and arms at the top then you would cut your animal along it's midsection. If you want an animal lovie with the head at the top and the hands/paws on the sides, then you would cut just the head off and then cut the two arms off. If you want an animal lovie with the head on one side and the hands on the top corners and feet on the bottom corners then you would cut off the head, arms, and feet.
Step 2: Baste Close
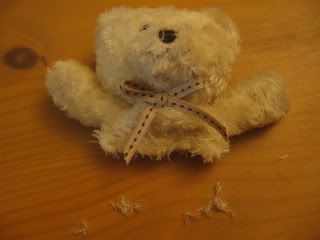
After removing the appendages you want to use, remove a bit of stuffing in the opening of each extremity and then baste the ends closed about 1/4 inch in from the cut edge.
Step 3: The Blanket
1. Place the blanket pieces together with right sides facing each other and pin together.
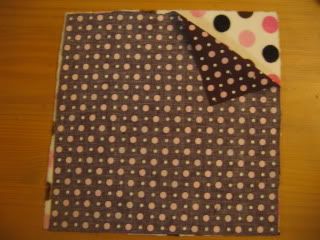
2. Decide which corner you want to place the head in, mark where the head lays and cut off the corner from mark to mark.
3. Sew the blanket together starting at one corner of the cut corner and working your way around to the other corner, making sure to not sew the cut corner closed.
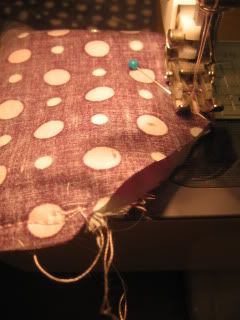
4. Turn the blanket right side out through the cut corner.
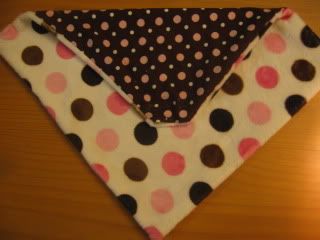
Step 4: Assembling the Pieces
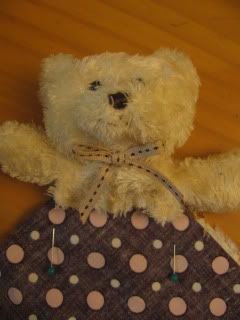
5. Turn the raw edge inward and place the basted edge of the stuffed animal head into the opening. Pin closed.
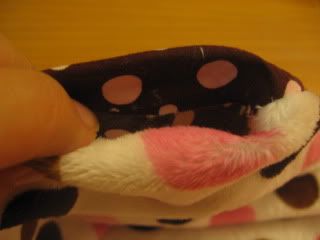
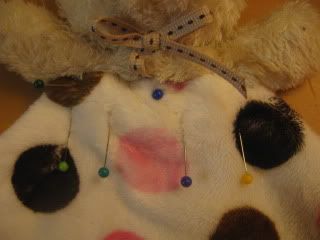
6. Carefully maneuver the animal head so you can sew the pinned edge closed and then continue to top stitch all the way around the blanket ending with sewing over the pinned edge one more time. Trim excess thread.
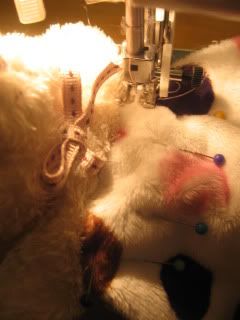
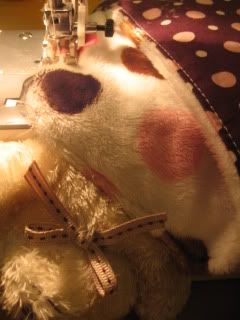
7. Ta-da! You have your own little animal lovie.
Thursday, January 7, 2010
We're Moving!
My family is moving from our little home on the sunny central coast of California for a place just a bit farther north, in the Bay Area. I'm really excited because it marks a new start and a new oportunity for us but... it also means changes to my beloved Living Water Boutique.
Looking into the future now it seems that Living Water Boutique will be closing up the shop and changing to just a blog. For anyone still interested in tunisian woolies, I still love trades but I will not be selling finished woolies or custom spots from here on out.
Maybe in the future, when things are more settled, and I have more time for crafting for others, I will open up shop again. But for now, I'll keep on blogging in my little corner of internet heaven :)
Looking into the future now it seems that Living Water Boutique will be closing up the shop and changing to just a blog. For anyone still interested in tunisian woolies, I still love trades but I will not be selling finished woolies or custom spots from here on out.
Maybe in the future, when things are more settled, and I have more time for crafting for others, I will open up shop again. But for now, I'll keep on blogging in my little corner of internet heaven :)
Subscribe to:
Posts (Atom)


 Posts
Posts